


Laying tiles on the bathroom floor is no more complicated than in any other room. You can even say that it is somewhat easier - a small floor area does not allow many errors to prove themselves. The difference in solving the issue of how to lay tiles on the floor in the bathroom is observed only in the sequence of work performed on a global level.
DIY tile laying in the bathroom on the floor photo
How to lay tiles on the floor in the bathroom: features of the work
The deviation in the technology of laying the floor in the bathroom may be affected by the presence of such a plumbing fixture as it. Usually it is installed before the walls are laid, and it must already be mounted on the tiled floor. Here another question arises - will this brand new floor not be spoiled with glue for tiles or a hammer accidentally dropped out of the hands? It is impossible to prevent such a turn of events, therefore, first a tile is laid under the bath, then a bath is installed (except for the bottom row) and only then the floor and, accordingly, the walls below are reported.
Tiles are laid a little differently in the absence of a bath. If you plan, then the floor fits in the very least. Naturally, before the lower trim of the tile will be done. In addition, it should be understood that gluing tiles to an unprepared floor is unreasonable - firstly, it is an overuse of glue, and secondly, not every specialist will be able to lay the tile on a thick layer of glue. It floats, and if you still put a little glue, then the teeth and elevation drops are guaranteed.

How to lay tiles on the floor in the bathroom photo
In a good way, before laying tiles, you need to carry out a number of measures to level the floor. And you need to do this according to all the rules - you need to tear down the old screed, waterproof the floor, fill in a new rough coating in compliance with the plane and horizon level, and only then, when the new screed is dry, can you start laying the tiles on the floor in the bathroom.

Floor tiles in the bathroom: do-it-yourself styling
With this sorted out, you can proceed to the direct technology of laying tiles on the floor.
How to put tiles in the bathroom on the floor, see the video clip.
Technology for laying floor tiles: sequence of work, subtleties and nuances
We will not touch on the features of the question of how to lay the tiles on the floor in the bathroom, we have already figured them out, but consider this technology without reference to this room. Anyway, everything described below is true for any premises. To make it more clear, we will present this information in the form of a small instruction on the items that display the sequence of work. Naturally, we will not forget about the nuances.
- Cleaning. Everything is simple here - we take a broom, but rather a dry moss and clean the floor surface, as they say, to zero - there should not be a speck of dust or a speck on the surface.
- Primer for the floor with a composition of type Ceresit CT17. The solution is not diluted, but is used as is. We pour it into a bucket and with the help of a mackerel put it on the surface of the screed. The mixture needs to be rubbed into the floor, and not just wet the surface with it. You need to rub it before the formation of white foam - this is a clear indicator that the screed has ceased to absorb the primer and is saturated with it. The primer should dry thoroughly - at least within an hour. This operation is best done at the end of the day, having prepared for yourself the front of work in the morning. In the morning, the primer can be repeated - it will not be worse. You can not wait until the second layer of soil is dry, it is enough that he will not stand on the screed.

How to lay tiles on the floor in the bathroom photo
- Primer on the floor with glue. Many masters ignore this step and immediately proceed to laying tiles in the bathroom on the floor. Do not do this, since such a primer increases the bonding area - the glue is clogged in all pores of the screed, thereby increasing the adhesion of materials. For the same reason, it is necessary to cover the tile itself with a thin layer of glue. If you pay attention to its back side, you will see protruding stripes in the form of rectangles on it - they are also needed to increase the bonding area. This is why you need to fill the gaps between these strips with glue.
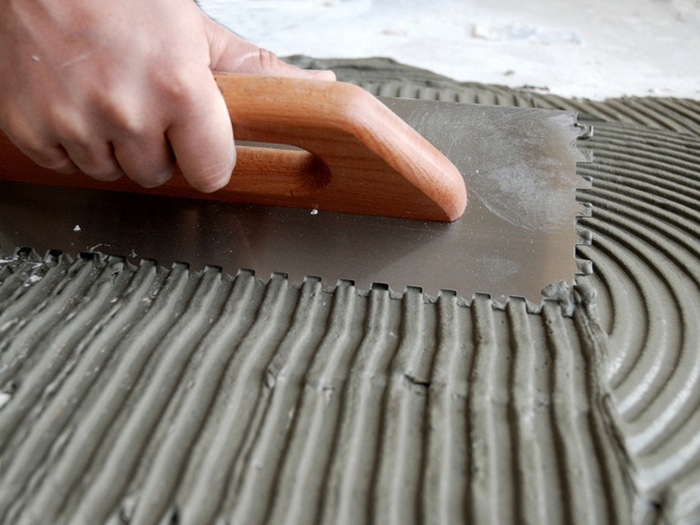
- Glue on the floor. You will need a notched trowel, popularly called a "comb". With a flat type spatula, glue is applied to the floor and distributed evenly with a comb. It should be noted that this should be done in one direction. Why? You will understand this further.

How to put tiles on the floor in the bathroom with your own hands photo
- We glue the tile. I want to make a reservation right away, on most of the tiles (on its back), the manufacturer stamps the arrow - this is the recommended laying direction. In a small area, this nuance will not be noticeable. But if we are talking about a large space exceeding 20kV. m, then a violation of this recommendation will lead to an expansion or narrowing of the seam. In general, it is better not to violate this nuance and lay the tile with an arrow in one direction (in any). As mentioned above, first the tile is covered with a thin layer of glue and only after that the solution is applied to it using a comb. Strips of glue should go in the opposite direction from the floor. In this way, a full filling of the space between the tile and the screed is provided.
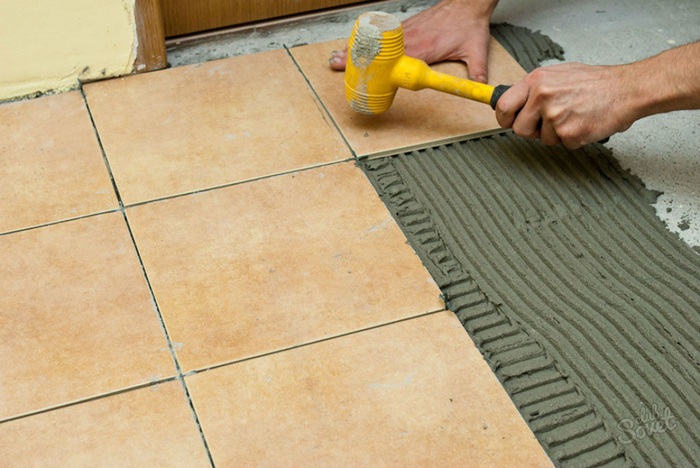
- Laying tiles. Everything is simple and complicated here. Just attach it to the floor and align it against the wall. It is difficult to orient in a plane according to the horizon level - you will need a level and a lot of patience. In general, it is better to align in a plane two tiles at once - it’s more convenient. At the same time, set the plane and set the level.

The nuances of laying floor tiles for the bathroom
- The first row fits without problems, but with the second and subsequent rows there are some nuances. In principle, all the subtleties ensure the uniformity of the seams and the absence of teeth in the places of their intersection. Firstly, these are crosses - if you pay attention, they have a conical shape. This is done so that it is possible to vary the width of the seam within a millimeter. Although it is better not to play such games without experience - insert the cross to the full depth or, at least, control it within the same limits, and everything will be fine! Secondly, each tile laid and laid out in a plane must be knocked into the corner formed by the previous tiles. In a small area, such measures will be invisible, but in large spaces - simply indispensable.
- Grouting. Floor tiles for the bathroom, or rather the seams between it, are wiped after they are completely dry, i.e. in a couple of days. Everything is simple here - the dry one is diluted with water to the consistency of the paste, which is used to fill the joints with a rubber spatula. When the grout dries a little, the seams are corrected with a finger, and the excess remaining on the tile itself is erased with a dry rag.

How to align tiles on the floor in a plane when laying
Well, in conclusion, a few small tips that will help you avoid some problems and solve the question of how to lay tiles on the floor in the bathroom, in the best way. First, do not let the level out of your hands - constant control of the plane is simply necessary in this matter. Secondly, after laying each tile, clean the edges with a spatula from excess glue. Well, and thirdly, it is better to carry out the laying of tiles in the room at a time if possible - after the adhesive has hardened, it will be difficult to change anything in the position of the tile. If for some reason you still have to interrupt this process, then the started row must be reported to the end, and the glue protruding from under the tile should be removed from the floor.
Laying floor tiles on your own is a feasible task, although not an easy one. Each stage, starting with the choice of material, requires a responsible attitude and care, otherwise it is impossible to achieve a high-quality result. The longest and most laborious process is the preparation of the base, and the better the surface is prepared, the easier it is to lay the tiles on the floor in the bathroom. The technology of the cladding itself is not too complicated, and if you follow the instructions exactly, you can do fine even in the absence of experience.
The range of floor tiles is huge, and immediately choose is not so easy. When examining samples, first of all pay attention to the following characteristics:
- tile thickness;
- the presence of anti-slip coating;
- resistance to chemically aggressive effects;
- moisture resistance.
The optimal thickness of the floor tiles is 9-12 mm, in shape and size it is best to choose a square tile of 200x200 or 300x300 mm. There are many varieties of curly tiles that look very impressive and unusual, but their laying requires high skill. For the same reason, a beginner should not choose options that form a complex pattern when laying - here you will need a very accurate calculation to fit the pattern, and with a lack of experience, this is not easy.
Beginners are better off choosing classic square-shaped tiles.
The water absorption of the material should not exceed 4.5%, the friction coefficient, on the contrary, should be maximum - from 0.75. This tile remains safe after water gets on it, which happens very often in the bathroom. Information on technical characteristics is always present on the package, so carefully select the data when choosing.
And do not buy tiles if the seller cannot provide a certificate of quality - all trustworthy manufacturers have certified products.
bathroom tile
In addition to tiles, you will need to purchase glue, materials for waterproofing, grout for joints. Glue is best taken on a cement basis: it is relatively inexpensive, easy to apply, provides excellent adhesion of the tile to the base and is not afraid of moisture. Popular options are Ceresit CM 11, Eunice Plus, Weber vetonit ultra fix.
It is most convenient to use waterproofing coating (for example, Perfekta AquaStop), plaster (Ceresit CR-65, Knauf FLACHENDICHT) or impregnating (Penetron). These compounds are easy to apply and form reliable protection against moisture penetration.
As for grouting, here you need to choose between cement and epoxy mixtures. Cement is cheaper, easier to apply, for the novice master the best option. Epoxy compounds are more durable and durable, but it is more difficult to work with them.
moisture resistant tile grout
Floor preparation
Laying tiles should be done on the most even, solid foundation. Do not leave cracks, chips, potholes and other defects, otherwise very soon the new coating will become unusable. First of all, you should carefully examine the floor and determine the degree of unevenness. To do this, attach the building level to the base in several places and measure the width of the gaps under the tool with a ruler. If the deviations do not exceed 5 mm, additional alignment is not required - all the irregularities will be covered by the adhesive solution. In this case, the surface is simply cleaned of dust and thoroughly primed.
If the differences in height are large, you need to visually determine the highest point of the floor and make markings around the perimeter of the room to fill the screed. Marking must be performed with the help of a level, otherwise the floor may turn out to be inclined. Next, beacons from the profile are installed and cement-sand mortar is poured. It takes about a month to dry the screed, and until it is completely dry, you can’t start finishing. If the tile is laid on a damp base, it will soon begin to lag and may even burst under load, so it’s better not to risk it.
After drying, waterproofing is necessary. The protective composition is applied with a roller or brush on the floor surface, capturing the walls by several centimeters. Corners and joints should be worked out especially carefully. By the way, many masters do not apply waterproofing, but prefer to process the dried screed 1-2 times with a deep penetration primer. For normal operation of the bathroom, this is quite enough, but in case of flooding, water easily overcomes such a barrier and flows through the ceilings to the neighbors.
Video - DIY floor waterproofing in the bathroom
Choosing a styling method
Before proceeding with the cladding, you need to choose the optimal laying method for the tile:
- traditional - the tile is arranged in even rows both horizontally and vertically. This option is the most common and easiest for a beginner. The tiles used are usually square, although this method can also be applied to rectangular tiles;
- diagonal - laying is done in even rows, but along the diagonal axes of the base. Such a coating looks attractive, but laying takes longer to trim and fit the elements, in addition, more accurate calculations are needed;
- with displacement - installation is carried out according to the principle of brickwork, that is, in each horizontal row, the tiles are displaced by half their width. Suitable for square and rectangular elements. Laying with offset can be carried out diagonally;
- "herringbone" laying - performed as a parquet, suitable for rectangular tiles. This method requires a lot of time, accurate calculation and skill;
- modular - cladding is performed with tiles of different sizes of square and rectangular shapes. For masonry, it is necessary to carefully select a drawing and draw up an accurate diagram indicating the dimensions of the elements and seams. The method is effective, but laborious, requiring a certain experience and skill;
- with a shift - during installation, each tile is slightly shifted vertically and horizontally at the same time, and the resulting gaps are closed by a smaller tile. It looks very attractive, but requires an accurate fit of the elements and a lot of time.
If there is no experience of such work at all, it is best to choose the traditional method - this will save you time and minimize the consumption of material for trimming. But, despite the simplicity, you still have to try: on such a coating all defects of the seams are perfectly visible, therefore, when laying, you should show maximum accuracy and attention.
Tile Laying Technology
So, we have an even, dry base for facing. You can proceed directly to laying the tiles on the floor, and how to do this, we will consider in the most detailed way.
To work, you will need:
- construction mixer;
- two putty knives - regular and serrated (with a tooth height of 8-10 mm);
- rubber mallet;
- long bubble level;
- plastic crosses for joints with a diameter of 2-2.5 mm;
- tile cutter or grinder.
Step 1. The tiles are laid out without glue on the floor in order to choose the most optimal location and check the tightness in the corners.
For example, if the corners are uneven, you will have to cut the tile, which will require additional effort and time. It is impossible to fix such a defect in a different way, therefore, you should take care of the correct angles at the stage of leveling the walls.
If the last tile in the row does not fit completely, it is better to move the tiles so that the same distance remains on both sides, and when laying, trim both extreme elements. So the lining will look much more aesthetically pleasing. Having decided on the location of the material, the extreme tile is circled with a pencil along the contour - this marking will begin laying.
Step 2 The surface of the floor is treated with waterproof soil with additives against mold. Soil can be applied with a wide brush or roller, the main thing is that there are no missing places. After this, you need to wait for the base to dry.
Step 3 A glue solution is prepared: dry glue is poured into a bucket of water at room temperature and stirred until smooth with a mixer at low speeds. If mixed at high speed, a lot of air bubbles form in the solution, which will lead to a weakening of the adhesive layer and its shrinkage. Stir for a couple of minutes, then let the solution stand for 5 minutes, mix again. The exact proportions of water and dry mix are indicated on the packaging, so read the instructions carefully before starting work.
Step 4 Glue is collected with an ordinary spatula and applied in a thick layer to the floor, without going beyond the marking lines. The application area should correspond to the size of one tile. Having leveled the solution, they take a notched trowel and pass it along the glue so that deep grooves are formed. Movements are performed only in one direction, so that all the grooves are parallel.
Step 5. Take the first tile, moisten with water, and in the same way apply glue to its back side. Having carried a notched trowel, they lay the tiles so that the grooves intersect at right angles. This installation provides the best grip and makes it easy to cover minor bumps. The lateral edges of the tiles must necessarily coincide clearly with the marking lines, and one side should fit snugly against the wall or screen of the bathtub. Firmly press the material to the floor, after which a bubble level is applied and the horizontal is checked. If necessary, the tiles are trimmed with a rubber mallet.
Tip. Usually on the back of the tile there is an imprint of an arrow indicating the direction of the masonry. Even if the pattern on the front surface is difficult to distinguish, chaotic, you need to always place the tile so that the arrow is pointing in one direction - this will avoid distortion of the picture and give the cladding a neat appearance.
Step 6 The solution is again applied, this time for several elements at once, they are leveled and dispersed with a notched trowel all the time in the same direction. Take the next tile, moisten it with a wet sponge from the back, cover with glue. Putting it on the surface, plastic crosses are inserted at the junction to ensure a uniform seam. Pressed, aligned horizontally. The level now needs to be applied immediately to both tiles at several points, so that differences in height do not form between them.
Step 7 In the same way, all the rest of the whole tiles are laid, and then the cropped ones are fixed. To properly trim the material, a whole tile is applied to the remaining portion of the floor between the wall and the cladding, and a cut line is drawn with a pencil. Next, with the help of a tile cutter or grinder, they cut off the excess and lay the fragment on the glue.
Tip. Before applying glue, carefully inspect the edges of the tiles: if there are chips on them, it is better to let such elements be trimmed for corners and hard-to-reach spots. In an open area, these defects will catch the eye and spoil the whole look.
Step 8 Having laid the first row, proceed to the second, observing the same thickness of the seams and constantly monitoring the horizontal level of the coating. When laying, you need to move from the far wall to the doors so that in the process you do not step on already glued tiles. It is very important to monitor the angle reduction, for convenience, you can put an additional cross at the intersection of the seams. It is not permissible that height differences form at the corners - constantly check these areas for level.
Step 9 After completing the installation, leave the room for a day so that the glue hardens well. After this time, crosses are carefully removed and the excess solution remaining in the seams is removed.
Step 10 After this, you can start grouting the tile joints - jointing. The grout mixture is applied with a rubber spatula: a small amount of grout is collected and distributed along the length of the seam, carefully rubbing the mixture into the recesses. You need to work slowly, evenly filling the voids and removing excess mixture. In addition to seams, grouts process joints along the perimeter of the sewer exits.
Step 11 10-15 minutes after applying the grout, the treated joints should be wiped with a damp sponge to wash off the rest of the mixture. Do not allow the solution to dry, otherwise it will be much more difficult to remove it from the lining surface. When cleaning the coating, the sponge should be rinsed as often as possible, and the water should be changed, otherwise white stains and streaks on the tile will remain.
Video - Tile grout
After about two weeks, the joints can be further protected with a waterproof compound that is applied over the grout. On this, the floor finish is considered complete, and if everything is done according to the rules, the coating will serve for years, retaining its original appearance.
Video - Laying tiles on the floor in the bathroom
If you are planning a reconstruction or major overhaul of the bathroom, looking for a practical option for finishing the floor, listen to the recommendations of designers who claim that there is nothing better than ceramic tile. The re-equipment of the bathroom entails serious costs, so you need to use any way to reasonably save.
Since the labor costs of a professional tiler exceed the cost of a tile of the middle price category, it is better to refuse its services by doing it yourself. This article will help you figure out how to lay the tiles on the floor, what tools are needed, and how to properly prepare the room before starting work.
Varieties of masonry
Diversity strikes the imagination, sometimes even making the selection process more difficult. Its shape can be square, rectangular and in the form of other, more complex shapes. Tile laying is carried out in various ways, depending on the geometry of its elements:
- Parallel method. Properly laid in this way, the tile resembles a sheet of a notebook in a cell, especially if a contrast grout was used for grouting the joints. This method is good for tiles of rectangular and square shape. Parallel laying is easiest to do with your own hands, so even a beginner finisher can lay tiles in this order;
- Chess method. To lay a tile in this way it is necessary as a brick wall when laying "in half a brick." This solution looks more effective, but it’s more difficult to do the job yourself. The best result is achieved using rectangular tiles. Putting the tiles in a checkerboard pattern is neatly not so easy, but the effect is worth the effort;
- The diagonal method. Most often it is used for decoration with square tiles. Since laying is done diagonally, as if from an angle to the opposite corner, the squares look like rhombuses;
- Mosaic method. Manufacturers offer entire collections of tiles, with the help of which they create a pattern or drawing on the floor. As a rule, such layouts are much more expensive, it is advisable to use them in the bathroom, whose area is more than 20 square meters. m so that the image is clearly visible. It is incredibly difficult to put it with your own hands, and if you take into account the high cost of the material, it will be right to entrust the work to a professional.


Please note that the diagonal way of laying ceramic tiles increases the consumption of material, since due to trimming and fitting during operation, up to 30% of unsuitable residues are lost.
Preparation of tools and materials
In order to finish the bathroom floor with their own hands, experienced craftsmen recommend purchasing tiles that meet the following requirements:
- Tile thickness should be in the range of 9-12 mm;
- II stability class or higher;
- High resistance to abrasion, hardness, AA moisture protection category, resistance to aggressive detergents.
Consider the large tile, especially if it is dark in color, visually reduces the area of \u200b\u200bthe bathroom, so choose medium-sized options of the same color with wall decoration.

In addition, in order to properly tile the bathroom floor, you need the following tool:
- Construction mixer;
- Rubber spatula;
- Notched trowel;
- Glass cutter;
- Masking tape;
- Building level;
- Rubber mallet;
- Tile adhesive, grout, primer;
- Crosses;
- Water, mixing bowl, rags.
Work order
In general, laying tiles on the bathroom floor is carried out in the same way as when decorating other rooms. However, there are secrets that allow you to get the perfect result with your own hands. The main difficulty in working in the sanitary room is the availability of plumbing equipment and pipes that lay tiles in a special order.
As you know, a washing tank is installed before the decorative wall covering is installed, but how then to lay the floor tiles so as not to get dirty, not damaged during the repair process? Experienced craftsmen follow the following pattern:
- First, you need to put the tile on the floor area on which the bath will be installed;
- Then install the bath;
- The next stage is laying tiles on the surface of the walls;
- Only after the completion of dirty work do you need to lay out the flooring.

If a shower cubicle is planned to be installed in the sanitary room, the installation sequence is different: first a shower is installed, then a wall covering, and at the end of the repair, the floor is finished directly.
Preparing the floor for decoration
The key stage in the repair process, which guarantees a good result and a long explantation of the bathroom tiles, is the preliminary preparation of the floor for tile laying. Before laying the tile on the floor, it must be properly prepared:
- Remove the old decorative coating, screed and waterproofing, optimally if you clean the floor to the very base;
- If possible, level the surface with the building level, cement chips and cracks with a cement mortar;
- To recreate a new waterproofing layer with mastic or roll material based on bitumen or rubber;
- Pour screed. Please note that the maximum thickness of the layer of leveling compound that you can apply at a time with your own hands is 1.5 cm;
- After the screed hardens, remove dust and dirt from the floor using wet cleaning;
- Apply a primer with the help of a mowcloth, as if rubbing it into the screed. As soon as white foam begins to form on the floor surface - you can finish the primer, the concrete has already absorbed everything that it could.


The primer dries in a few hours, but it is better to perform this operation in the evening, so that in the morning to begin laying tiles.
Advice! Try to lay the tiles on the entire floor area of \u200b\u200bthe bathroom in one day to eliminate all the flaws, until the glue has frozen, if you still have to interrupt, do this after completing the row by removing the rest of the solution from the edges.
Styling technology
When the bathroom is ready to finish the floor, you need to prepare a special tile adhesive from the dry mix. To do this, pour the contents of the package into a clean bucket of water, start mixing only after 10 minutes. Further work goes according to plan:
- The floor is primed with a thin layer of tile glue using to improve adhesion between it and the tile;
- Glue is applied to the surface of the floor with a notched trowel, the tool is wired strictly in one direction, forming an even layer;
- They begin to lay out the first row, having put a thin layer of glue on the tile, it is pressed tightly to the floor so that there are no air bubbles between them, which increase the fragility of the coating. It is necessary to ensure that the tile is positioned correctly relative to the wall and the horizon, this is checked using the building level;
- After the first tile is laid, a cross is applied to the corner to form even, neat seams, and then the next tile is attached. Pressing it to the floor, you need to gently knock it out with a rubber mallet from the side;
- Similarly, they act during the laying of tiles in the entire area of \u200b\u200bthe bathroom. Without parting with the level, slowly, removing excess glue, even a novice tiler will be able to do the job efficiently. If you want to cut tiles, use a glass cutter.


Parallel laying can start from the wall, but laying in a diagonal way is necessary from the center of the bathroom, so that the pattern is symmetrical. Do-it-yourself laying of floor tiles is a good way to master this type of finish, gain experience, and move on to more complex construction tasks.
Video installation instructions
The most practical and durable flooring in rooms with high humidity and high traffic is ceramic tile. It is easy to clean, does not absorb grease and dirt and is highly moisture resistant. Due to its moisture resistance, tiles are often laid on the walls and floor in the bathroom. But before you put this finishing material yourself in the bathroom, you need to find out how to do it right. By the way, the main disadvantage of the tile is that the cold surface is easily eliminated with the help of the underfloor heating system. Therefore, it can be argued that such a product is an ideal material for a bathroom, bathtub, kitchen, hallway or corridor. The video at the end of the article will help you more clearly figure out how to put tiles on the floor in the toilet or bathroom.
Base requirements

If everything is more or less clear when laying tiles on the walls, then before laying this material on the floor, you must first understand the base. Laying such a product in the bathroom is allowed on monolithic cement screeds and rough floors. The main requirement for any base is strength and evenness. Therefore, before starting to lay the elements on the old screed, it must be checked for reliability and evenness. All cracks, potholes and crevices must be repaired, the peeled concrete removed, and the surface leveled and primed.
When laying tiles on a rough wooden floor, all floorboards must be checked for strength, rotten ones should be replaced, and creaking ones should be attached more firmly to the logs. Particleboard or plywood can be used to level such a foundation.
When laying tiles in the bathroom with your own hands, you must make waterproofing. At the same time, the waterproofing material must be put on the walls of the room. For these purposes, you can choose coating compounds, penetrating waterproofing or roll materials.
Styling nuances

To properly make a tiled floor in the bathroom with your own hands, you need to start laying products from the center of the room. To do this, center lines are drawn from the middle of each wall. At the intersection, we get the center of the room. If the walls are not parallel, then we find the center by connecting the corners of the room with lines. When we found the center of the bathroom, the masonry can be conducted in three ways:
- the central point of the room coincides with the center of one of the elements;
- in the center of the bathroom is the midpoint at the junction of the faces of two adjacent tiles;
- four elements converge at the center point.
Tip: the central point of the masonry of the tile can be mixed in any direction, depending on the pattern, the arrangement of furniture and sanitary equipment. If the masonry will be carried out on the diagonal of the room, then the center can also be shifted in the right direction.
How to apply glue
Before you start laying tile elements in the bathroom with your own hands, you should first study the rules for applying glue. Moreover, for gluing tiles on the walls and floor of this room, the same special adhesive is used, which is applied with a notched trowel. To facilitate and speed up the process, you should familiarize yourself with the intricacies of working with tile adhesive:
- To properly lay the elements on the walls and floor in the bathroom, you need to choose the right notched trowel. To do this, using the selected tool, first apply glue to the product and press it firmly to the floor. Then immediately remove and look at the back side. The adhesive should be evenly distributed over the surface of the element. This indicates that the height of the trowel teeth is correct. If there are gaps between the adhesive strips, you need to choose a tool with higher teeth. If glue is squeezed out from under the tile, grab a spatula with smaller teeth.
Tip: the glue can be applied using any tool (trowel, ironers, etc.), but the composition can be leveled only with a gear product.
- We put the spatula with glue at right angles to the product and draw it on the surface. The teeth of the tool should leave the same furrows without glue. This is the only way you can do the masonry yourself.
- Sometimes glue is first applied to the floor or walls, after which tiles are applied and pressed. In order to glue the finish in this way in a good way, after applying the adhesive mixture, no more than 15 minutes should pass. Otherwise, it polymerizes and does not adhere to the material.
- The horizontal masonry is checked by the level in all directions.
- After laying adjacent elements, the glue squeezed out in the cracks should be cleaned with a damp cloth, since then this place will be treated with grout.
Tiling

We lay the tiles in the bathroom with our own hands in the following sequence:
- First, we make a trial layout of the elements from the center of the room. At the same time we observe gaps. This will help us determine the width of the outermost products. If you want to lay out the tiles so that all the edge elements have the same width, you may need to shift the center of the layout in the direction you need.
It is important to know: the width of the extreme tiles cannot be less than ½ of their size.
- Now the floor in the bathroom needs to be divided into two parts using a wooden battens, which we nail with nails to the base.
- We will lay the tiles on the glue applied to the screed. We work from the wall farthest from the entrance. We apply glue from the rail to the width of the element and a length of 1 m. We lay the first tile close to the rail. Between adjacent elements we set dividing crosses. Tile leveling, tapping with a mallet through a piece of board.
- Thus, we lay the elements in one part of the bathroom, separated by a rail, after which you can lay the tiles in the second half of the room. In this case, the glue under the first surface should dry, only after that it is possible to remove the wooden lath. Fascia elements can only be glued after the glue dries under the main tile. This will allow you to boldly move around the surface.
- To trim the extreme elements, we use improvised materials. To do this, put the trimmed tile on the last whole element in a row. To maintain clearance from the wall, we use a gasket of the required thickness. After that, we lay the ruler on the cropped product, equalizing it along the edge of the whole tile. Draw a line on the ruler. On this line on the element and make an incision.
Attention: the extreme elements are not laid close to the wall, but with a small seam.
- For cutting tiles it is better to use a special tile cutter tool. First, an incision is made on the front side of the product, then with the help of a lever we make a break in the line of the incision.
- Correctly make a curved incision using a grinder and a special disk for cutting tiles. The part of the tile to be cut must protrude beyond the workbench.
- When the laying is completed, in a day you can proceed to grouting. The trowel is applied with a rubber trowel. In this case, try to press the composition into the seams. To evenly distribute the grout, do not apply it over very large areas immediately. Otherwise, after setting, you cannot distribute it.
How to use grout

When the do-it-yourself masonry is done, it remains to apply the grout correctly so that the surface takes on a finished look. Our recommendations will help you master the intricacies of grouting:
- When all the seams are filled with grout, the excess composition must be wiped off the tile. For these purposes, you need a special grater. It must be kept at right angles to the surface. So that the grouting composition is not selected from the seams, the tool must be driven diagonally on the tile. If somewhere there is not enough grout, you can add it in the course of work.
- When the entire composition has been removed from the surface, the seams must be given time to dry. This usually takes from 5 to 35 minutes. It depends on the humidity in the bathroom, the type of adhesive, the characteristics of the base and tile.
- Do not wait until the grout has completely hardened before using wet surface cleaning. Otherwise, you can only wipe off the grout with an abrasive tool. The fact that the grout is ready for final cleaning is indicated by its good elasticity and dense texture. Now the surface can be wiped with a wet sponge.
Important: if the grouting mass reaches for the sponge during wiping, this indicates that it does not dry sufficiently.
- To remove dried grout, use sandpaper and a grater. However, such tools can scratch the surface of the tile, so it is better to take a regular grater with a mesh. After such removal of the dried composition, wet surface cleaning is used.
A compromise option may also be interesting, as
- Plastic mixing basin - 1
- Grater with a sponge - 2;
- Graters made of metal - 3.4;
- For laying tiles with dimensions of 300 mm or more, you will need a spatula with teeth of 10 mm - 5;
- When installing the floor from a small tile, a spatula with teeth of 4-5 mm - 6 is suitable;
- Thanks to the grater, the excess solution is easily removed from the rubber, if necessary - 7;
- Brush - 8.
Also for reliable installation of tiles in the bathroom you will need:
- The mallet is a rubber hammer. This tool is designed to remove air voids between tiles and a concrete base. The desired effect is achieved by tapping on the surface of the finishing material;
- Shovel-trowel;
- Knife cutter with which you can cut ceramic tiles (6 mm). If the tile is thicker, use a construction cutter to adjust the shape.
- Wedges or crosses made of plastic, with the help of which the distance for joints between tile elements is set;
- Bulgarian;
- Square to adjust for even styling;
- Plumb line;
- Building level;
- Reiki
- Pliers.


2. Preparation of the base of the floor in the bathroom
The surface of the floor for tiling should be flat, despite the base material (concrete slab, reinforced concrete or wooden floor).
Correction of the concrete surface can be carried out by means of an even screed based on cement and sand. Components for leveling mixture:
- Sand;
- Cement powder;
- Water. The amount of water is determined by mixing the mortar, the consistency of the mixture should resemble sour cream;
- The optimum thickness for the screed is about 3-5 mm.
The proportion of cement component in relation to sand is 1: 3 (for rooms with high requirements for wear resistance). If tile laying is planned for a cottage or apartment, a ratio of 1: 4 is sufficient.
Concrete floor preparation instruction, after leveling:
- It is necessary to clean the base from debris and dust with a brush, while the floor surface must remain dry;
- Using a cement-sand mortar, all gaps should be filled, then the surface is ground;
- The cement layer must dry thoroughly, after which it is possible to impregnate the surface with a primer. An aqueous solution with the addition of a primer contributes to a more reliable adhesion to concrete;
- Instructions for preparing the soil solution are on each package;
- Carefully distribute the composition with a spatula over the entire base.
In the event that the masonry is planned in a room with a high level of humidity, it is necessary to protect the base with the help of a waterproofing layer.
Thanks to proper waterproofing, the base of the floor is protected from the damaging effects of moisture. As a protective layer, as a rule, special mastics are used. Coating with mastics occurs after applying a primer solution to the base. After waterproofing, a metal mesh is placed on the concrete floor.
Creating Layouts Before Laying Tiles
Before you start laying tiles with your own hands, you need to perform a detailed layout as follows:
- Take measurements of the dimensions of the bathroom;
- Those angles that will be the beginning of the masonry, it is better to designate separately, as well as to think through a sequence of actions, direction;
- If the tile was cut, it is better to place it in a less visible place, for example, in the corner of the room;
- When several types of different tiles are assembled, it is convenient to use special dividers - thresholds made of metal.

Thanks to high-quality marking, you can optimize all the finishing work, avoid defects during installation, as well as the appearance of bumps on the surface. Take this item as carefully as possible.

How to make layout correctly?
- Start laying tiles from the far corner of the outer wall, or from the middle of the room, moving towards the door. The first method allows you to use the tile in its original size, without undercutting, the second method is characterized by maximum binding to the shape of the room;
- It is better to orient the tiled row parallel to the outer wall of the room. Thus, the space will look neat;
- In the process of marking, the shape of a certain tile should be taken into account, the size of the seam between the tiles should be determined and this distance should be maintained over the entire floor area;
- In order to fix the desired position of the elements, use plastic crosses, which can be purchased at hardware stores. The width of such wedges is about 1.5-2 mm;
- The surface of concrete should be marked. This approach facilitates the preparation of the training correctly;
- The mounting gap between the tiles hides the error of individual tiles, which is allowed by the manufacturers. The distance laid on the eve of the work hides a similar error.
- Also, the presence of a gap ensures the safety of the cladding material. With temperature differences, the tile will not crack;
- A transverse and longitudinal reference marking is not enough. After laying the first row, it will be difficult to continue working correctly;

- It is better to place a tile with a decor in advance and think over placement in real scale. Thus, it is possible to understand whether the planned image fits completely, whether it needs to be adjusted in size. Preliminary actions will allow you to get a spectacular floor cladding with a beautiful decor;
- Provided that the decor is small, try to choose for his device the place that will be viewed to the maximum and will not make furniture in the future;
- In the case of a large-scale drawing, evaluate which part can be closed without significant loss of ideas.
3. The main stages
- Using a special spatula with teeth, glue prepared on the eve of laying is distributed on the inside of the tile;
- It is recommended to direct the spatula at a certain angle to the surface, about 40 degrees. So the composition will remain on the material;
- It is necessary to act quickly, since the glue dries quickly enough;
- It is not necessary to exert strong pressure on the tile when laying, since the surface can be distorted - become uneven, the decorative properties of the material are violated;
- Constantly check the evenness of laying with a special device - level or corner;
- Tapping with a mallet promotes better adhesion of the tile to the base;
- Wedges to form gaps are removed after about an hour after the ceramic tile has been laid. After 24 hours, the seams can be treated with a sealed composition;
- The final stage is the cleaning of glue residues and stains.


During the day after laying, the seams should not be overwritten. At this point, the adhesive shrinks. If you rush and wipe the gaps immediately, cracks will appear in the material quickly enough.
4. Grout
There are several rules for applying grout after laying the tiles:
- The consistency of the grout should resemble thick sour cream;
- Using a rubber spatula, the gaps between the tiles should be repaired with the resulting composition;
- While pressing the spatula to the seams, direct it with the Christmas tree along the joint;
- With the final movement of the tool, remove the excess grout.
- A joint filled with grout can be affected by a small piece of cable of circular cross section, aligning the thickness of the filling.
Residual joints can be removed after one hour. Use a rag or sponge soaked in water. Under the condition of regular wiping (every 3 hours), the substance will gain maximum stability properties. The recommended number of such effects is two or three times.
As a rule, four to five days is enough to completely dry the composition.

5. Cutting of facing material
Most often, this action is applied to the extreme rows located near the walls. Tile trimming is carried out using a grinder, tongs, as well as a glass cutter.
To make a neat and accurate cut, you should use a special machine designed to trim the tiles. This device allows you to achieve accuracy up to 1 mm.

6. The order of prices for masonry tiles in Moscow
- Laying ceramic tiles on the floor in the bathroom without screed: about 600 rubles / sq.m;
- Grouting between the elements: about 100 rubles / sq. m;
- Leveling screed for laying tiles: from 200 rubles / sq. m and above.
7. Video
You will also be interested in:
Tsugunov Anton ValerievichTour time: 5 minutes The modern design of the premises is often not ...

Do you want to make a bath in the house? Be prepared to meet serious requirements and ...
The easiest way to update the exterior walls of the house and give them uniqueness is ...

Trimming gooseberries is not a whim of perfectionist gardeners, but the most important procedure, from ...
If you have empty niches in your home, you can fill them with built-in wardrobes ....

