


In recent years, sandwich chimneys have become increasingly popular, which have a fairly low price, a long service life and an attractive exterior. Beginners and experienced builders are also attracted to the sandwich pipes by their simplicity and ease of installation, which they can do with their own hands even without special experience. However, you will need to know some of the nuances and subtleties of such a process as installing a chimney made from a sandwich. Consider the main issues and installation procedure in more detail.
The name "sandwich" was assigned to this pipe due to the presence of several layers. It consists of three parts: at the edges of the metal and in the center of the insulation placed between them. This design eliminates the problems that accompany metal pipes:
- The outer layer does not heat up to high temperatures due to the presence of insulation;
- The insulation prevents a large amount of condensation from accumulating;
- The outer layer does not heat up, which greatly facilitates the installation process.
There are two types of sandwich pipes on the construction market:
- Galvanized steel. Such chimneys are rarely used, mainly for the output of combustion products of gas equipment of low power. At high temperatures, zinc has the property of fading, steel loses its protection against rust, as a result of which the chimney is destroyed;
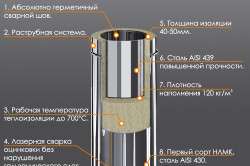
- Stainless steel. Designed to divert high-temperature combustion products. They differ in the thickness of the metal, insulation and the alloy used: these can be alloys with a small content of additional impurities or high alloy metals, which are characterized by the highest heat resistance. Often, the inner and outer metal layers are made of various alloys, which allows to reduce the price of the finished product, while maintaining its basic characteristics.
Sandwich Pipe Selection
The choice of sandwich pipes is also made taking into account the insulation. Typically, such prefabricated chimneys use non-combustible stone wool. When choosing a sandwich damper, you need to pay attention to its thickness:
- The insulation 30 mm thick is designed to remove gases not more than 250 ° C. These are gas boilers of low power;
- 50 mm insulation is used for readings up to 400 ° C. These are gas boilers, oil-fired boilers, wood-burning stoves;
- 100 mm basalt wool is rated at 850 ° C. It can be used in solid fuel boilers, fireplace.

When choosing a sandwich chimney, consider the temperature range of the insulation used. This information must be sought on the label.
Differences between different sandwich chimneys lie in the type of connection. Imagine two main ways:
- With a bell. One of the edges of the chimney is equipped with a wide bevel. This allows to achieve high tightness of the structure. It is recommended to use a similar type of connection for gas boilers where leaks should not be allowed.
- The connection with the corrugated edge allows you to quickly and easily assemble the chimney, however, to achieve tightness, you will have to spend a lot of high-temperature sealant, the cost of which is quite high.
There are pipes with a longitudinal seam, which is performed by welding or rebate.
Highlights for installing a sandwich chimney
Installation and conclusion of a sandwich pipe is primarily guided by fire and construction safety standards:
- When conducting the chimney through the floors and roofing, it is necessary to mount a special steel box, which serves as additional thermal insulation and does not allow nearby materials to heat up;
- It is forbidden to connect a sandwich chimney to the inlet pipe of a boiler or furnace in a direct way. According to building codes, the use of sandwich pipes is recommended after the pipe is led out through a wall or roof;
- When passing in the vicinity of the wall, the latter should be protected by a sheet of refractory material such as asbestos;
- The horizontal position of the pipe is allowed no more than 1 m, as this adversely affects traction;
- The joints of the pipes should not be in the place of output through the roof;
- The output of the pipe should be made between the rafters, in order to achieve the desired position of the pipe, bends of 45 ° are used;
- All elements of the chimney must have a common diameter. When docking, a steel clamp and sealant that is resistant to high temperatures are used;
- At the bottom of the pipe, it is necessary to make a glass or door through which you can monitor the condition of the pipe.
Installation of a sandwich pipe
The first step is to install a single-layer stainless steel pipe, which will dissipate a large amount of heat. If an immediately insulated pipe is installed, then the entire chimney and its outer part may overheat.
Consider how to correctly pass the floors and the roofing pie when the chimney is brought out:
- A hole is made in the roof, which is 15 cm wider than the diameter of the output pipe. A sleeve is inserted into this hole;
- The space inside must be filled with non-combustible insulation - stone wool or expanded clay;
- The gaps in the upper and lower part of the sleeve are masked by sheets in the shape of a square. To ensure a tight passage through the roof, we recommend paying attention to the penetration of silicone based on aluminum, it takes the form of a roof and allows you to quickly and easily seal the pipe outlet through the roof.
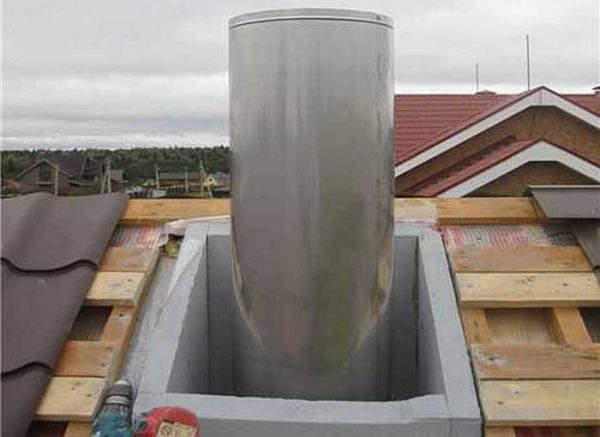
It is important not to forget to close the top of the sandwich pipe with a special overlay to prevent water from entering the heater. It is also possible to mount a special umbrella over the pipe that will prevent precipitation from entering the chimney.
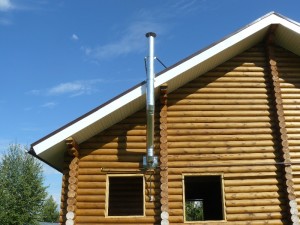
Pipe outlet through a wooden roof
When a sandwich pipe exits through a roof from a tree, it is especially important to comply with all fire regulations. The use of sandwich pipes is recommended for buildings made of wood, since the design of the pipe itself implies the protection of external elements from high temperatures. However, when using these pipes additional protection is necessary.
This is conveniently accomplished using the ceiling passage unit, which is a box. Its functions are as follows:
- Preservation of the pipe in its original form, protection against deformation;
- Protection of wooden elements of the roofing system from fire upon contact with the chimney.
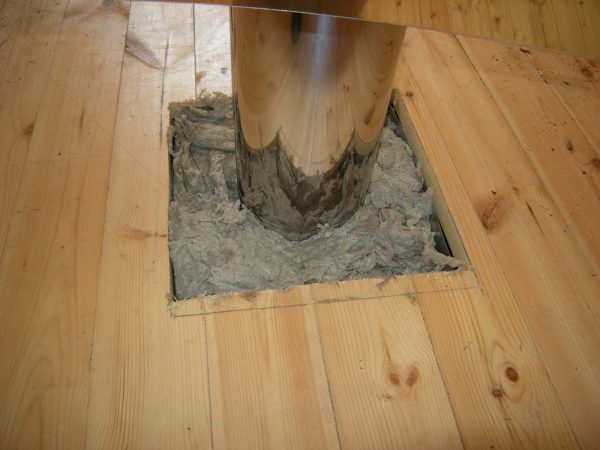
It is important to properly fill the box with thermal insulation from non-combustible insulation such as basalt wool. She can’t just wrap the pipe, as this will lead to its overheating and heat transfer to the outside of the chimney. The solution to this problem lies in the use of a special sleeve, where the sandwich chimney is previously placed, and only then it turns into a heater. The sleeve reduces the temperature transmitted to the insulation, and also removes part of the heat outside the cutting boundaries.

It is important to create a 3 mm gap around the sleeve to allow air circulation and cooling naturally. In this case, the use of a boiler or furnace can be made for a long time without stopping, without fear of overheating of the chimney.
findings
Installing a sandwich pipe through the roof carries a number of nuances, compliance with which is necessary for the fire safety of the building. Although the structure of the sandwich chimney provides a certain degree of protection of the external part of the pipe from overheating, when using this design in wooden buildings, it is necessary to further isolate the pipe from contact with wooden elements of the roof structure.
For competent and safe installation of this type of chimneys, it is important to pay attention to the material from which they are made, and the thickness of the insulation. The possible scope of using various types of these pipes depends on these parameters.
Watch a video about installing a chimney from a sandwich pipe.
Removing the chimney through the roof of the bathhouse or wall is a rather laborious procedure. Incorrect installation and quick work on insulation lead to the formation of moisture on the internal structure of the chimney, even the option of burning a furnace is possible.
In order to avoid any dangerous or unpleasant situations, at the selection stage, you should consider the kind of built-in unit, understand the device and, finally, proceed with installation, and you can do it yourself without the involvement of outsiders or professionals.
As we already said, the chimney device can be placed in two versions:
- Heading up to the ceiling through the roof - the masters propose to put a mentor or root device.
- Into the wall. Such a chimney is called outdoor. This method assumes a safe exit through the wall and is considered less fire hazard.
It is easier to implement the second version of the chimney, but there are drawbacks here:
- far from every room, the furnace structure is located near the wall bordering the street space (the optimal distance from the wall to the furnace is within 50–70 cm);
- if the pipe is brought out, the heat leaves the room faster.
What is important when installing a chimney through a roof or wall? Ensure that there are no seams in the bushing. If there are joints before or after - it's okay, but they should not be inside.
How to assemble a chimney from a sandwich pipe
In order not to interrupt during the installation process, it is necessary to prepare all the components for subsequent assembly into a single device in advance. The advantage of the sandwich construction is that in its manufacture a technology is used that greatly facilitates the installation process of a complete unit. Edges of a sandwich pipe are processed with a smaller diameter in comparison with the main component.
The narrowed part is brought to another pipe, the strength of the connection provides a clamp. Masters advise to process the weld area with a sealant that copes well with temperature loads.
Chimney device through the wall
 The arrangement of a chimney from a sandwich pipe laid through a wall includes the following sequence of manipulations:
- Outline where the chimney will go, this place will have to be taken apart, do everything carefully and slowly so that the wall does not collapse. If the building is old and literally falls apart before our eyes, cracks crawl along it, first the structure needs to be strengthened, otherwise it will not withstand the load of the chimney.
- If the wall is solid and solid, the area near the transition should still be strengthened so that nothing crumbles along the edges. A neglect of this stage of installation in the future will lead to the gradual destruction of the wall. Most often, at the stage of strengthening, bars or special components are used, which are sold in stores selling building materials.
- Next, fasten the bracket to the hole, on which the runners are fixed, allowing easy passage of parts through the wall.
- The wall near the chimney aisle area should be covered with plywood sheet. A sheet of asbestos is laid on top, it remains to lay another layer - galvanized metal, this wall treatment can be considered completed.
- It is possible to protect the fastening components from corrosive processes with a lacquer; on its label it should be indicated that the lacquer is designed to work with metal.
How to remove a chimney from a sandwich pipe through the roof
 The installation of the chimney through the roof is as follows:
- Make a recess in the roof, if necessary - strengthen the hole.
- To facilitate the installation process, it is desirable to place a roof groove in the hole. The angle of inclination is selected, depending on the angle of inclination of the roof. The structure should be in close contact with the roof, no gaps or crevices. The edges of the part are made under the finish of the roof or under the ridge.
- Correctly process the inner surface of the hole in the roof, for this use an undercover metal sheet.
- On top of the roof cut, a so-called apron is fixed, providing a high degree of tightness.
- A sandwich pipe and other chimney parts are placed on top of the roof to the installed apron.
- For the reliability of fasteners in the process of assembling a chimney from a sandwich pipe, self-tapping screws should be used.
The final stage of installation
The device unit ends with the following steps:
- Remove the protective film from the sandwich pipes. It is extremely undesirable to release parts from polyethylene before - they can be damaged during transportation or installation.
- Properly process joints with sealant. Ideally, the composition should withstand temperatures in the range of 1000 degrees.
Which areas need to be coated with sealant:
- seams in the joints of the inner sandwich pipes - a plane located on the outer part from above;
- joints of outer pipes - the entire area of \u200b\u200bthe outer surface;
- the junction of the sandwich pipes with other components of the system - the entire area or diameter, if we are talking about round pipes.
Do not rush to immediately operate a new chimney, first check that it works correctly:
- Turn on the heating device (boiler, stove or fireplace) at low power.
- Now inspect the device for smoke in the wrong places.
- Ensure that there is no excessive heating of the components of the complete system, especially in the area of \u200b\u200btransition through the wall or roof.
What is a chimney made of sandwich pipes good for? It looks aesthetically attractive and provides a fireplace with a modern style, its assembly is even for a novice. And also, with proper installation, it will last a long time and will please the owners with uninterrupted operation.
Have you built a bathhouse (house or other structure) and are you going to install an insulated chimney made of stainless steel? So, you will be interested to know how to properly pass a sandwich through the roof and other features of its device.
An excellent solution for organizing gas removal from heating stoves and fireplaces is to install a chimney sandwich, which does not need constant maintenance and additional care.
Features of this design
A sandwich is a good option for a chimney with insulation. Warming provides you with the following advantages:
- the possibility of chimney functionality when in the zone of low temperature conditions;
- gives the pipe the necessary fireproof properties (inside the building).
Standard options for such chimneys have an external galvanized coating. Also available are options made of stainless steel, as well as painted in any color suitable for you.
Existing sandwich options made of stainless steel are glued on the outside with a special protective film. The main thing - do not forget to remove it before using the chimney for its intended purpose. There are also special adapters on sale that you will need when connecting the boiler and pipe. Be careful when choosing items for a sandwich chimney.
Necessary tools during the work are:
- jigsaw;
- pencil or marker;
- roulette;
- level;
- bulgarian;
- screwdriver.
Sandwich Chimney Installation
The chimney can be connected both directly to the stove and to the heat exchanger (tank) through which the passage of the chimney is made.
The first thing to do is install a single-wall stainless steel pipe of the desired length. Installation of a single-wall pipe will help in the first stage to dissipate a large amount of heat.
When installing an insulated version of the chimney (sandwich), a large degree of heating will contribute to overheating of the outer contour of the chimney.
In the first version with a single-wall pipe, you will significantly reduce the thermal load on the chimney and at the same time provide a quick heating of the steam room. The next step is the installation of the insert-valve (gate) in the absence of it in the furnace for the bath. With a low bath ceiling, the gate is fixed directly to the furnace (tank, heat exchanger), single-wall pipes are not used.
Now you need to perform the device of the lower nozzle. She will make the transition between two types of pipes - single-wall and insulated (sandwich). The time has come to install the insulated bath pipe. It should be the length you need and be placed to the highest point of the chimney. It would be inappropriate to install a single-walled pipe in the upper part of the chimney after a sandwich. With this option, the flue gases will cool quickly enough, which contributes to the deterioration of draft and the formation of condensate.
To make passage through the floors of the bath (combustible), you can use the so-called telescope. In this design, there is an adjustment for the desired thickness of the existing floor.
The installation technology is as follows:
- A hole is cut from the wood flooring that is 15 cm larger than the diameter (outer) of the sandwich pipe. A telescopic sleeve will be placed in this hole.
- The space between the overlap of the bathhouse (house) and the installed sleeve is filled with heat-resistant insulation, as an option, expanded clay can be used.
- Sheets of square shape, fixed below and above, will mask the gap (where) and help maintain an attractive appearance.
Another nuance: in order to efficiently carry out a tight passage through the roof of the bath, it is necessary to use a special silicone penetration made on an aluminum base, which easily takes the form of a roof.
In the upper part of the chimney pipe there is an insulated nozzle covering the insulating material from the sandwich. So, protection against moisture and destruction is provided to you. An umbrella is installed in this nozzle designed to protect the chimney from various types of precipitation. All joints of elements and thermal insulation (nozzles, pipes, and so on) are strengthened with tightening clamps to prevent separation.
Pipe passage through a wooden roof. Common errors and runtime technology
When installing a chimney in a wooden house, to ensure fire safety requirements, particular importance is attached to how the pipe passes through the wooden floors. Protection of these places is mandatory and is carried out using sheet steel equipped with holes, and using non-combustible thermal insulation materials.
Often, a special ceiling walk-through unit (PPU) is used for these purposes. Its appearance resembles a box or a sleeve. It is mounted to perform the following functions:
- to prevent deformation of the chimney in case of shrinkage or deformation of the structure;
- to protect hardwood floors from fire.
![]()
A fire-fighting device when carrying out work such as the passage of a chimney through the ceilings and the roof (baths, houses) is mandatory in any case. One of the best options is to use a special chimney system (double-walled, sandwich).
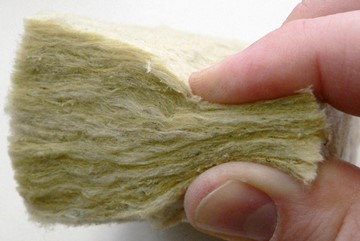
Usually problems arise where poor quality thermal insulation materials were used in the cutting device. For example, the use of general construction insulation in return for a special non-combustible type. As an option for such insulation, basalt cotton wool (non-combustible) can be used.
Another mistake is the use of basalt wool inappropriately. Since basalt cotton wool has an accumulating ability and accumulates thermal energy (temperature), then with a simple wrapping of the chimney in the process of intensive heating (more than 4 hours), the insulation will accumulate a large amount of heat and will reflect it back (to the chimney). And this will inevitably lead to overheating of the chimney of the bathhouse or house.
This problem is solved quite simply. For this, a special metal sleeve is needed, located around the insulating layer of the groove (for example, superisol can be used as thermal insulation). The sleeve is made in the form of a cylinder, its height is equal to the thickness of the cut. Its functions include lowering the temperature and removing heat outside the cutting area.
An important nuance is the necessary device microventilation system located around the sleeve. This is an air gap of about 3 mm. Since air movement around the sleeve is ensured, it cools and the temperature drops. In this case, the use of a heating device can be carried out for a sufficiently long time without fear of a possible overheating.
Over the past few years, chimneys have been manufactured using a sandwich pipe. People are attracted by its appearance, low cost and long life.
A very important factor is the ability to do the installation of a chimney sandwich with your own hands.
Of course, the installation of such a chimney requires certain skills in construction and knowledge of some nuances. However, with great effort, such work can be done independently. The main thing is to figure out how to do this correctly and not to lose safety attention from attention and comply with fire safety standards. Carefully monitor the chimney insulation.
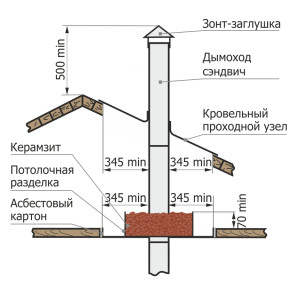
Such an operation requires a preliminary study of the location of the rafters and installed floor beams.
The pipe should be between these parts. The outer wall of the chimney must not touch the fuel element. A minimum distance of 13 cm must be maintained. Moreover, the combustible element must have a heater. To fulfill this requirement, it is very often necessary to make a pipe offset. To do this, the pipe in two places is carried out at an angle of 45 degrees.
Important! Installation of a chimney from a sandwich pipe through the roof starting from a solid fuel boiler is carried out steel pipe for a chimney that does not have insulation. It is clearly visible in the photograph. She is painted black. An adapter for a sandwich is installed at the end of the pipe. The feed-through unit is connected to a sandwich chimney having insulation.
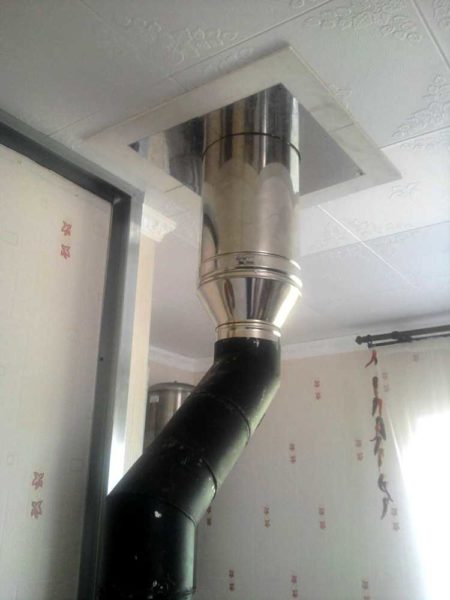 A special hole is made in the ceiling. It should be made taking into account fire standards. The distance from the chimney must exceed 250 mm, and the ceiling must be closed with insulating material.
At the edges of the hole, they are protected by a fireproof thermal insulation material - minerite. You can nail it with ordinary nails or use self-tapping screws.
The sandwich is inserted into the box made. Its direction is made vertical, deviations are not allowed.
The pipe does not need to be fixed very rigidly and firmly, just create a direction. From falling it will keep 2-3 planks. But the vertical movement will be completely free. This design is done so that the pipe can move up or down. When heated, the pipe increases in length, and this requires additional space and freedom of movement.
The free remaining space is covered with basalt wool. You can fill everything with expanded clay or foam glass granules.
A few years ago, ordinary sand was used. However, he gradually slept through the existing cracks. Today, this option is completely abandoned.
The front side is wrapped in stainless steel. A non-combustible gasket is made under this sheet. In previous years, the gasket was made of asbestos sheet. Today, asbestos is considered a carcinogen, so it has been replaced with mineral wool.
You can use another way. Close the edges of the hole with mineral wool, and only then install the assembled feed-through assembly made of stainless steel sheet.
After the pipe is led into the attic, a hole is made through the roofing pie. Cross-cutting waterproofing is incised. The resulting triangles are carefully wrapped and then fixed with a construction stapler. The opened crate is cut off, maintaining a distance to the chimney of more than 13 cm.
The right photo (red arrows) shows an incorrectly made pipe passage through the roof. The distance separating the pipe from the boards is made very small. With proper manufacture, the edges are chipped with minerite, the fire standard is maintained. The following photo shows the correct manufacturing of the passage. 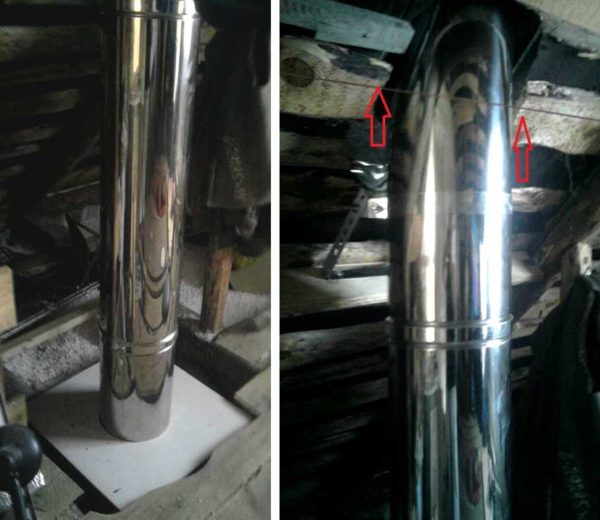
After the roofing is done, the pipe closes with a master flash. An appropriate skirt is made corresponding to the shape of the roof.
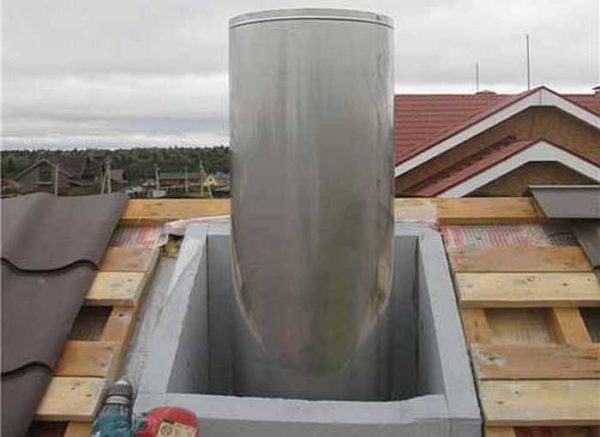
The junction of the pipe and rubber gaskets is treated with heat-resistant sealant.
Sandwich modules must be secured with clamps. The internal chimney can also be pulled together with their help.
Installation completion
After assembly is complete, remove the protective film from the pipe. The length of the chimney is considered ideal, starting with the grate and ending with a tip within 5-6 meters. This value needs special attention. Then, all gaps and existing joints are sealed.
The operation is performed by heat-resistant sealant intended for the treatment of chimneys. It is able to withstand heating pipes of more than 1000 degrees. The sealant treatment is as follows:
- Inner pipes. The outer surface of the upper part is covered;
- Outer pipes. One outer surface is machined.
The junction of the double-walled pipe with other parts is processed only from the outside of the entire circumference;
The places where the modules and the single-wall pipe are combined are sealed according to the latest version.
After completing all work, it is necessary to check the condition of hazardous areas for temperature soaking.
To facilitate the maintenance of the chimney, a special audit is provided. This part has a removable part or is equipped with a hole having an opening door.
Common errors
When a chimney is installed in a wooden house, fire safety must be strictly observed. It is very important to correctly make and process the passage of the sandwich pipe through the floors made of wood.
These places should be well protected. Usually for this, sheet steel is used in which holes are made. Free space is covered by non-flammable heat-insulating materials.
To facilitate the work, quite often a special ready-made assembly (PPU) is installed. Its appearance is very similar to the box. Its installation is done to perform certain actions:
- If there is a shrinkage of the house and its deformation, the chimney should maintain its original position;
- PPU protects wooden floors and does not allow their ignition.
When work is being done on installing a chimney pipe, a passage is made with violation of the ceilings and the roof, it is imperative to comply with all fire requirements.
The best option for laying a chimney is the installation of a special sandwich system.
All problems appear only if low quality insulation materials were used during installation.
 For example, the installation of conventional general insulation instead of special non-combustible material.
One of the options for such insulation is basalt wool.
Sometimes it is used incorrectly. This material is capable of storing heat. If you simply wrap a chimney in it, then after 4 hours of operation, the insulation will begin to give back the stored heat. The chimney will start to overheat.
To prevent this from happening, you need to install a special steel sleeve. It should cover the cutting insulation layer. As thermal insulation, you can take superizole.
The sleeve should be in the form of a cylinder. The height of the product should be equal to the thickness of the cut. The sleeve will not allow the temperature to rise, and will remove heat from the cutting.
It is very important that a microventilation system is made around the sleeve, which is an air gap, of small thickness - 3 mm. The air moving around the sleeve will cool it, resulting in a decrease in temperature.
Installing the sleeve will allow you to use the heater for a long time without possible overheating.
You will also be interested in:

Many people are interested in astrology not only in terms of making predictions for the near future ...

The Feng Shui Love Zone in the apartment is located in the southwestern sector. The right organization ...
Neurons (neurocytes, actually nerve cells) are cells of various sizes (which ...

Quite often the question arises, how to calm the nerves, especially among residents of big cities, ...

The deceased looks with one eye - he looks out for a companion. When the dead are closed ...

